Integrating To Quickbooks
In this post we will see how we can integrate QuickBooks Desktop / Server version with an Asp.Net web application. After going through the Intuit developer’s portal I understood that we need to use QuickBooks Web Connector tool to integrate a desktop version with a web application.
Here is a pictorial representation of communication model and data flow. 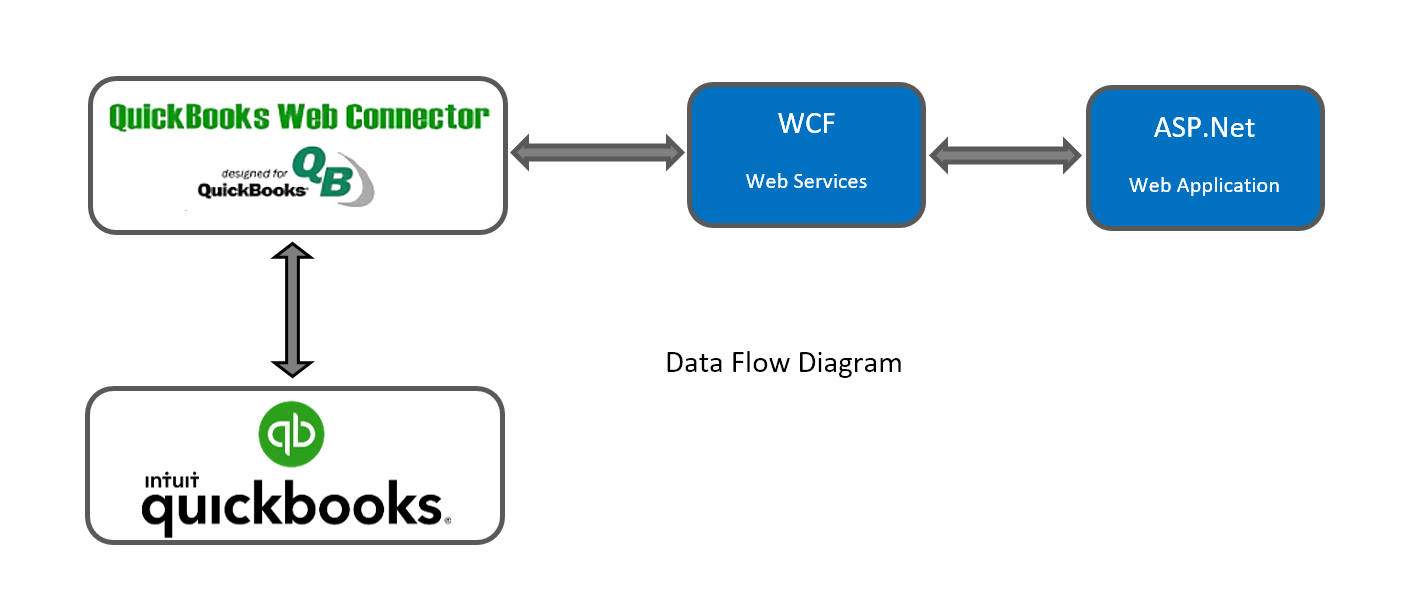
There are few options available to for integration but, I will provide a link to the QuickBooks Web Connector Programmer’s Guide that will explain why QBWC is the best and easy way to do it. The guide is very helpful in terms of getting started but the links are not updated. It took me a week to put everything together and make it work. I don’t want you to waste your time and get started right away with the template provided. Please get the WCF project from here.
QuickBooks Web Connector Program Guide. Click Here
Sample WCF Servie Solution to get started with. Click Here
The QuickBooks Web Connector (QBWC) is a Microsoft Windows application that that enables specially designed web services (interface driven) to exchange data with QuickBooks desktop products (QuickBooks Financial Software and QuickBooks Point of Sale). For QWBC to talk to our web application we need to build a WCF service with operation that QBWC understand and expose our data through that web service. Download the tool here. Click Here
In any integration we have two sides and each side has their own responsibilities. Let me quickly explain the responsibilities of each side in simple steps
Your Customer Side
- Your Customer need to download the most recent version of QBWC tool from the link provided here and install it on his machine.
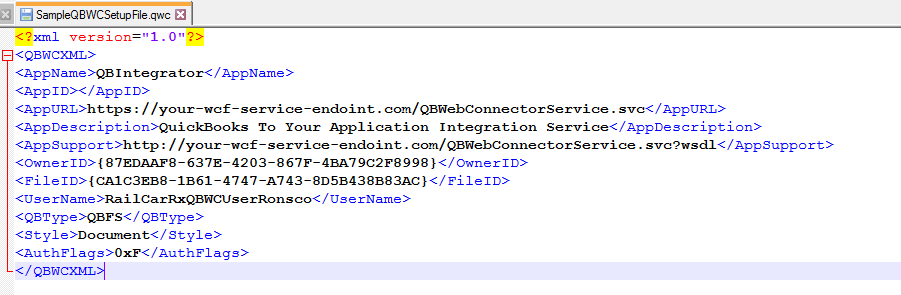
- You will provide a QWC File, this is a XML configuration file that will provide all the necessary information for the QBWC to connect to your web service. It will have the end point URL, the User ID.
- Provide an option in your web application using which your end user should download the QWC configuration file. In my application, user can download the config file from his profile setup.
- You will provide the password for the User ID that you included in the QWC config file that you shared with the customer. In my application once user downloads the QWC file, I email the system generated random password to him email id.
- Your customer will use this file to setup the integration as shown below.
- Once everything is setup he can select the integration definition and press the update selected button to exchange data between QuickBooks and your web service.
Your Side
- As I said above you will create the Web Service with operations that QuickBooks Web Connector know to call in a sequence.
- Authenticate
- ClientVersion
- CloseConnection
- ConnectionError
- GetLastError
- ReceiveResponseXML
- SendRequestXML
- The developers guide will explain clearly the need for each operation. Every operation has its own purpose, but SendRequestXML is the key operation using which we will control the data flow.
- For every request XML you send, QBWC will send the response to the ReceiveResponseXML operation. You can parse the XML to get the response for your request.
- GetLastError method will help you to understand any errors that might occur during the data sync. The Developer guide will walk you through that flow. The code samples will help us understand it better.
- During development mode, enable logging and see the sequence of operation calls. Make the flow break and see how the operations are handling errors.
- You will create a QWC Configuration file that will used by your customer to setup the integration in the QBWC application.
- You will include the following details in the QWC file. In detail description of these fields is provided in the integration guide on page 35.
- AppName
- AppID
- AppURL
- AppDescription
- AppSupport
- OwnerID
- FileID
- UserName
- QBType
- Style
- AuthFlags
- You have to create a password for the user id that you have included in the QWC file and share it with the customer.
- One important thing to remember is that QBWC integration will work on HTTP only when your end point address is running locally, meaning only when the host name is localhost. It needs HTTPS when you deploy it to your QA or PROD environment.